The Cut List That Saves the Last Good Board
A woodworking cut list helps fit parts to usable stock, account for kerf and defects, and choose a cutting order before an irreversible cut wastes good lumber.
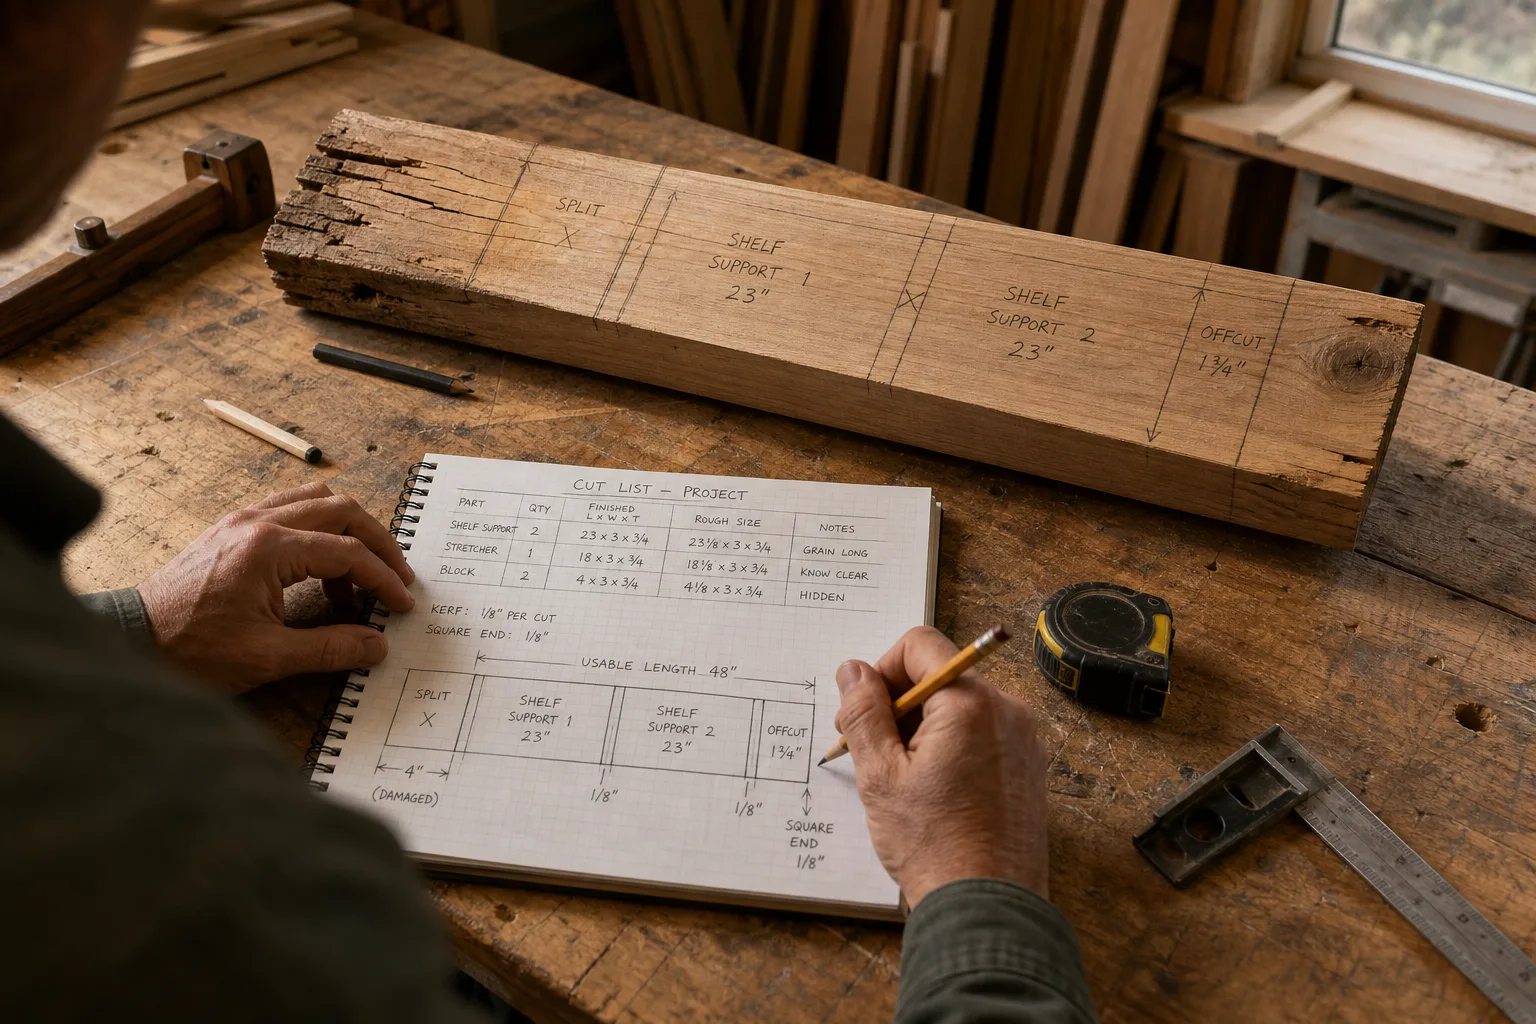
How do you make a woodworking cut list that protects the last good board? Start with the parts you need, then fit them to the board you actually have. A tape measure, pencil, and clear layout can keep one misplaced cut from turning useful lumber into awkward offcuts.
Measure usable stock
Write down each part’s finished length, width, and thickness. Then inspect the board. Its dressed dimensions may differ from its nominal size, and its ends may be split, checked, or ragged. Measure the usable area rather than trusting a label or an old note.
Mark knots, cracks, stains, and rough edges on a paper sketch or with a light pencil line on the wood. A knot might be acceptable in a short stretcher but troublesome where a screw must go. A split end may need trimming before it can provide a clean part.
Separate finished dimensions from rough dimensions. If a part needs trimming or sanding, decide what material those operations require and include it in the rough cut size. Avoid adding an unexplained allowance.
For each part, record:
- Part name and quantity.
- Finished length, width, and thickness.
- Preferred face or edge.
- Grain direction or a visible feature to preserve.
- Defects or end trimming that affect placement.
“Two rails” is easy to misread. “Two side rails, same length, grain intended to run end to end” gives you a useful cutting instruction.
Allow for each cut
A saw removes material along its path. That strip is called the kerf, and it matters when several pieces must fit along one board. Leave room for the blade, and account for squaring a rough end if needed.
Do not assume a blade’s stated width precisely predicts material lost with every cut. Blade condition, alignment, and how you guide the saw can affect the kerf. Draw a small gap between neighboring parts on a simple plan. If the fit is tight, make a trial cut on scrap using the same blade and setup, then use the observed kerf as a planning aid.
Mark the waste side of each line with an X. Check the line against the required finished size before cutting, especially if the board edge is rough or out of square.
Say you have a hypothetical sound board that is 52 inches long. The first 4 inches are split, leaving 48 inches of usable length. You need two shelf supports, each 23 inches long, and plan for a 1/8-inch kerf at each crosscut. First square the sound end, removing a hypothetical 1/8-inch slice. Then cut the first 23-inch support, allowing a 1/8-inch kerf, and cut the second 23-inch support. The sequence consumes 1/8 + 23 + 1/8 + 23 = 46 1/4 inches. That leaves 1 3/4 inches of usable stock, assuming the starting end is already square and no further trimming is needed. The layout fits; if inspection reveals another damaged section within the planned span, redraw it before cutting.
Read the grain carefully
Grain direction is both a visual choice and a consideration in how a part may behave. Running the grain along a part’s length is common, but strength and splitting depend on species, grain runout, defects, loading, and joinery. A grain arrow alone cannot establish that a piece suits a demanding structural role.
Draw an arrow for the intended grain direction on each part. On a long table apron or chair rail, that direction will often follow the length. For a square or nearly square panel, the intended face and grain pattern may matter more than a simple long-axis arrow.
Inspect the board before assigning parts. Grain may curve, run out at an edge, or shift around a knot. A straight arrow on the sketch cannot make a questionable section suitable for a load-bearing or highly visible part. If the board has a striking feature, decide whether to center, hide, or avoid it.
When several pieces should match, lay them out together. Compare their faces and grain, then label them so they stay in the intended order after cutting.
Arrange parts on paper
Draw the board as a rectangle and mark its usable edges, defects, and grain direction. Sketch the parts inside it using graph paper or proportioned strips of scrap paper. Show whether the pieces fit, which end gets used first, and where the saw cuts fall.
Place the least flexible parts first. A long visible rail with a preferred grain path may have only one suitable position. A short hidden block may fit an offcut. Protect the part with the fewest acceptable locations, then fit simpler parts around it.
Grouping cuts can reduce handling, but convenience should not override a sound layout. Number the parts in cutting order and mark waste on the sketch. Label useful offcuts by their approximate usable shape and defects, such as “short clear strip” or “knot at one end.”
- Check the board’s actual width against each part’s rough width. If the board is too narrow, choose wider stock or revise the part design; if it fits, keep that placement in the layout.
- Check the planned part area for splits or cracks. If a defect crosses a cut zone, shift the part or reject that section; if the area is sound, retain the placement.
- Check whether grain runs out near an edge. If it does, avoid assigning that area to a demanding part or seek qualified advice; if it does not, continue checking other requirements rather than assuming the part is suitable.
- Check the remaining layout space against every kerf and end-trimming cut. If the parts no longer fit, reorder or revise the layout before cutting; if they fit, mark the cut sequence clearly.
- Check where visible features will land. If a feature falls in the wrong place, rotate or reposition the part when dimensions and grain allow, or choose another board; if it suits the design, mark its orientation.
- Check that each rough blank leaves material for planned trimming. If it does not, enlarge the rough blank or change stock before cutting; if it does, keep the allowance tied to the named trimming operation.
When should you revise a cut list?
What if the board is shorter than expected?
Re-measure usable length after marking damaged ends and allowing for every cut. If the parts no longer fit, revise the layout or choose replacement stock before cutting; do not quietly shorten a part whose dimensions matter.
Can a knot stay in a part?
That depends on the part’s role, position, and the knot’s condition. Keep uncertain defects away from fasteners and heavily stressed areas, and consult a qualified woodworker if the piece has a safety-critical role.
Should I cut the longest piece first?
Often, but not automatically. Cut first the part with the fewest acceptable locations or the strictest grain and appearance requirements, then confirm that the remaining stock still serves the other parts.
What if I make a wrong cut?
Stop and reassess the design before trying to hide or patch the error. If the shortened piece fits a noncritical part, revise the layout; if it is a demanding structural component, replace it or ask a qualified woodworker about a suitable repair.
Spend scarce stock wisely
Not every board has the same cost of failure. A common scrap can tolerate a rougher plan than a board chosen for its color, width, or clear grain. If a mistake would be difficult to replace, pause before each irreversible cut and confirm the part label, orientation, measurement, and waste side.
Keep a pencil, tape measure, straightedge, and paper nearby. A square helps check whether an end is truly square, but a useful layout does not require specialized tools. Measure each part from one consistent reference edge rather than switching sides.
Before the first cut, compare the list with the marks on the board. Match every mark to a named part, check its grain arrow, and confirm that the waste is on the correct side. That pause helps when several pieces look alike.
A woodworking cut list is most useful when it describes the board you actually have: usable dimensions, grain, flaws, and the material each cut consumes. Record those details before cutting, and label offcuts so a later small repair can make use of them.
Nearby questions

Why Paper Buckles When Glue Dries
Why paper buckles when glue dries—and how grain, adhesive, and gentle pressing can help a bonded…

A Door Handle Is a Small Study in Leverage
Door handle leverage explains how grip, position, and clearance affect a door’s movement, helping you choose…